

Table of Contents
- Why Your Wrists Hurt After Lifting
- Step 1: Fix Your Wrist Position With Proper Wrist Position When Lifting
- Step 2: Build Support With Wrist Strengthening Exercises for Lifting
- Step 3: Know When Wrist Wraps for Lifting Pain Help (and When They Don't)
- Step 4: Learn How to Modify Workouts for Wrist Pain
- Step 5: Manage Load, Rest, and Recovery
- Step 6: Use Equipment That Removes the Wrist Bottleneck
- Step 7: Red Flags and When to See a Professional
- Frequently Asked Questions
Last Updated: October 9, 2026
Why Your Wrists Hurt After Lifting
Wrist pain lifting is usually a load problem, not a weakness problem. When your wrist bends back under a bar or cable, the strain lands on tendons and ligaments.
Here's what happens. Your grip fails, your wrist drifts out of line, and the weight keeps moving anyway. The load shifts to the small structures of the wrist.
Most lifters blame weak wrists. The real culprit is usually position and load management. A common mistake is adding wraps or braces before fixing alignment.
Below, we break down seven steps to address wrist discomfort during lifting, from wrist position to a progressive return plan.
Step 1: Fix Your Wrist Position With Proper Wrist Position When Lifting
Proper wrist position when lifting means keeping the wrist in a neutral line with the forearm. No bending back, no curling forward. The hand and forearm act as one straight unit.
Neutral alignment spreads force across the whole forearm. A bent wrist concentrates it on a few small structures. That difference decides whether you feel the target muscle or your wrist.
Neutral Wrist Alignment on Presses, Curls, and Cable Work
On presses, keep the bar stacked over the forearm, not behind it. On curls, avoid letting the wrist drop into flexion at the top. On cable work, the handle angle matters most.
- Presses: wrist straight, knuckles facing up
- Curls: wrist locked, no backward bend
- Cable work: handle aligned so the cable pulls in line with your forearm
- Push-ups: knuckles stacked over wrists, or use handles
If your wrist keeps collapsing, the handle is fighting you. A fixed-angle attachment that holds the wrist in neutral removes that fight. That's the idea behind the neutral grip position recommended in strength training guidance.

Step 2: Build Support With Wrist Strengthening Exercises for Lifting
Wrist strengthening exercises for lifting build the muscles and tendons that hold your wrist steady under load. Stronger tissue tolerates more work.
You don't need much. A few minutes, three days a week, is enough to build a base.
A Simple 3-Day Wrist Strengthening Routine
Do this on non-lifting days or after your main session.
| Exercise | Sets x Reps | What It Trains |
|---|---|---|
| Wrist curls (light dumbbell) | 2 x 15 | Wrist flexion strength |
| Reverse wrist curls | 2 x 15 | Wrist extension strength |
| Wrist rotations | 2 x 10 each way | Range of motion |
| Plate pinches | 2 x 20 sec | Grip and stability |
| Banded wrist extensions | 2 x 15 | Forearm alignment |
Keep the weight light. This is tendon work, not a max-effort lift. Pain during these means back off.
Step 3: Know When Wrist Wraps for Lifting Pain Help (and When They Don't)
Wrist wraps for lifting help during heavy pressing, where they add stability and limit backward bending. They do not fix bad alignment, and they should not become a permanent crutch.
Wraps work by limiting wrist extension. That's useful on a heavy bench or overhead press. But if you wrap up for every set, your wrist may not learn to stabilize on its own.
Use them like this:
- Heavy pressing days: yes, wrap up
- Light or accessory work: skip them
- Pain that shows up on warm-up sets: wraps won't help, see Step 7
- Every single session: that's a sign to fix the root cause
Wraps support. They don't strengthen. Treat them as a tool for specific lifts, not a daily habit.
Step 4: Learn How to Modify Workouts for Wrist Pain
How to modify workouts for wrist discomfort comes down to one rule: keep training the muscle, change the angle. You rarely need to stop. You need to swap the movement or fix the setup.
The fastest fix is usually the setup, not the exercise. Here is how we coach the wrist on the four lifts that irritate wrists most.
Wrist Setup by Lift
Bench press. Stack the bar over the heel of your palm, not up near your fingers. If the bar sits high in your hand, your wrist bends back to balance it.
Overhead press. Same rule as bench: bar over the heel of the palm, wrist stacked under the bar. If your wrist caves back at lockout, the bar has drifted behind your forearm.
Front squat. This is the lift that punishes wrists hardest.
Deadlift. A mixed grip twists one wrist into supination under heavy load. If that wrist is the sore one, switch to a double-overhand grip with straps, or use a neutral-grip trap bar.
Exercise Swaps That Keep You Training
- Barbell bench press → neutral-grip dumbbell press
- Straight-bar curl → hammer curl
- Push-ups → push-ups on handles
- Back squats → front squat with a neutral grip, or safety bar
- Upright rows → cable lateral raises with a neutral handle
- Barbell row → chest-supported neutral-grip row
- Skull crushers → cable overhead triceps extension with a neutral handle
These swaps keep the load on the target muscle while taking the bend out of your wrist. For back work, a neutral-grip row or pulldown hits the same muscles without the twist. For triceps, a neutral cable handle lets you extend the elbow without forcing the wrist into a fixed straight-bar angle.
The Delta Grip Gym Cable Pulley Lateral Raise Attachment →
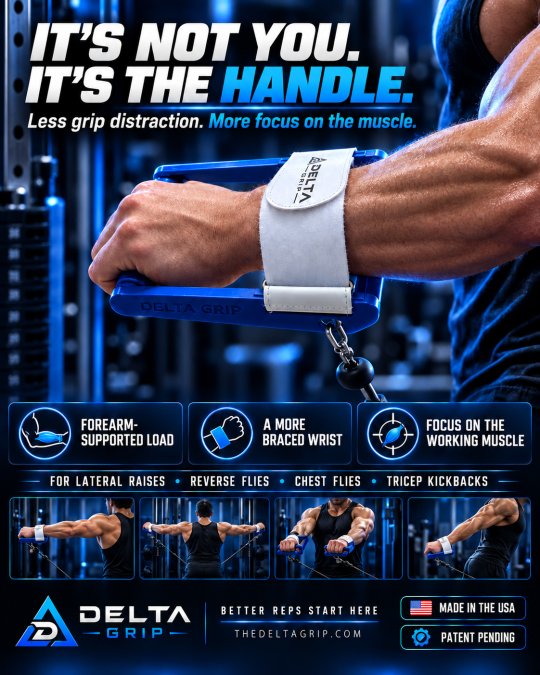
If your wrist keeps collapsing no matter how you set up, the handle itself may be the problem. A fixed straight bar forces your wrist into one angle. A handle that lets your wrist stay neutral removes that fight, that is the idea behind the Delta Grip, and you can see the setup on the Exercise Guide tab at The Delta Grip cable attachment.
Step 5: Manage Load, Rest, and Recovery
Load management means matching the weight to what your wrist can handle today, not what it handled last month. Gradual progression beats jumping back in.
Here is a concrete way to do it. When discomfort flares, cut your working weight by 20 to 30 percent and drop one set per exercise. Stay there for a week. If discomfort stays at a 2 or below on a 0-to-10 scale during and after training, add 5 to 10 percent back the next week. Repeat until you are back at your previous loads.
Pain Monitoring Rules
Use a simple scale during every session:
- 0 to 2: fine, keep training
- 3 to 4: reduce weight or range of motion, finish the session
- 5 or higher: stop the movement, swap the angle, and reassess next session
- Pain that lingers more than 24 hours after training: you went too heavy or too long
A dull ache that fades within a day is normal tissue adaptation. Sharp discomfort that lingers, wakes you at night, or shows up on warm-up sets is a signal to change something.
Rest and Activity Modification
That does not mean total rest. It means:
- Reduce volume on painful movements
- Keep training the muscles that do not hurt
- Ice a swollen or hot wrist with a cold compress for short periods
- Sleep and eat enough to support recovery
A Staged Return to Lifting
When discomfort settles, do not jump straight back to your old numbers. Work through these stages:
- Range of motion first. Move the wrist through full range with no load. If that is pain-free, move on.
- Light isolation. Add light wrist curls, reverse curls, and banded extensions at 2 sets of 15. Stay here until pain-free for two sessions.
- Neutral-grip compounds. Add neutral-grip dumbbell presses, hammer curls, and cable work at 50 percent of your usual load.
- Straight-bar compounds. Return to barbell pressing and pulling at 60 to 70 percent, adding 5 to 10 percent per week as long as pain stays at 2 or below.
- Full training. Resume your normal program, but keep the wrist setup rules from Step 4 in place.
If you stall at any stage for more than two weeks, consider consulting a professional rather than continuing.
Discomfort can be a feedback loop. Use it to adjust the load, not to decide whether to train at all.
Step 6: Use Equipment That Removes the Wrist Bottleneck
Some wrist discomfort during lifting comes down to the handle itself. A straight bar or fixed handle forces your wrist into a position it doesn't want to be in.
This is where The Delta Grip comes in. It's a cable attachment built to lock your wrist in a neutral position and transfer load toward the forearm.
It works across shoulders, chest, back, and triceps, not just lateral raises. The open frame design allows a natural range of motion, so the handle moves with you instead of against you.
If your grip gives out before your chest or delts do, this is the fix.
Step 7: Red Flags and When to See a Professional
Some wrist discomfort may require a doctor's attention, not just a program change. Knowing the difference can help prevent a small issue from becoming a long one.
See a professional if you notice:
- Discomfort that persists at rest, not just during lifting
- Swelling, bruising, or visible deformity
- Numbness, tingling, or weakness in the hand
- A popping or tearing sensation at the moment of injury
- Discomfort that gets worse over weeks despite rest and modification
These signs can point to a ligament sprain, a TFCC tear, or a nerve issue. A doctor or physical therapist can assess it properly. This article is general guidance.
For everyone else, the plan is simple: fix alignment, build strength, manage load, and use equipment that supports neutral wrist position. That's how to address wrist discomfort during lifting without giving up the training you love.
Frequently Asked Questions
Should I keep lifting if my wrist hurts?
It depends on the pain. Mild soreness that eases as you warm up usually means you can train with lighter loads and cleaner wrist position. Sharp, shooting, or swelling pain means stop and let it settle. Use a pain scale: anything above a 3 out of 10 during a set is a signal to reduce load or swap the exercise. If pain persists more than a week or two, see a health care professional before pushing heavy again.
How should I position my wrists when lifting weights?
Keep them neutral, meaning the wrist stays in a straight line with your forearm instead of bending back into extension or forward into flexion. On presses, stack the bar or handle over the forearm. On curls and cable work, avoid letting the wrist collapse backward at the top. A neutral wrist spreads load across the joint instead of concentrating it on the tendons and ligaments, which is where most lifting wrist discomfort starts.
Do wrist wraps help with pain while lifting?
Wrist wraps add stability and limit how far the wrist can bend under heavy load, which can reduce discomfort on pressing days. They are a tool, not a fix. Relying on wraps every session can let weak forearms stay weak. Use them for heavy top sets, then train grip and forearm strength without them on lighter work. If pain continues despite wraps, the issue is usually technique or load, not support.
What causes sore wrists after lifting?
The most common causes are a bent wrist under load, gripping too hard on cable attachments, sudden jumps in training volume, and repetitive pressing or curling without enough recovery. Less often, it is a sprained ligament or an irritated tendon, including the triangular fibrocartilage complex (TFCC) on the pinky side. Tracking when the pain shows up, which exercise triggers it, and whether it is on the thumb or pinky side helps you narrow down the cause.
Wrist pain shouldn't decide your training. At The Delta Grip, we built a cable attachment that locks your wrist in neutral, transfers load to the forearm, and lets you chase the target muscle instead of fighting the handle. It's patent-pending, made in the USA, and built for shoulders, chest, back, and triceps. Get started with The Delta Grip and train with better control, less wrist fatigue, and cleaner contractions.